.

.

Labels

Contributors

Sunday, 30 December 2012

Registry Editing has been Disabled by Your Administrator Error


If you’ve recently tried to open the Windows Registry and were presented with the message” “Registry editing has been disabled by your administrator”, then you’re not alone! You can get this message for several reasons and sometimes will not be able to run regedit unless you are an Administrator.
Most of the time you will see this in corporate environments where the IT staff has locked down the computer by disbaling Windows settings and services. If it’s a policy pushed out by the main servers, it’ll be pretty hard to bypass, however you can still try!
In order to re-enable access to edit the registry, you can try to edit the group policy settings and see if that works. If you know the local admin password for the computer, log in under that account. If not, you can still give it a shot.

Method 1

Step 1: Click on Start, choose Run and type in gpedit.msc.
gpedit
Step 2: Navigate to User Configuration – Administrative Templates – System
group policy
Step 3: In the right hand pane, double click on “Prevent access to registry editing tools
registry disabled by administrator
Step 4: If it is not configured, go ahead and enable it, click OK and then come back and disable it. If it’s already set to Enabled, then simply disable it.
Now try to run the registry editor and see if that works. If not, go to the command prompt (Start, Run, type cmd) and type in gpupdate. But if you are in a corporate environment, you may not want to do this as it will update back to the restrictive setting.
In that case, restart the computer, but unplug the network cord so that the computer does not refresh the group policy from the main server. You may also want to do the procedure above while disconnected from the network completely in order to ensure that the policy does not get overridden by the corporate policy.
If you have a home computer, then you don’t have to worry about all of this, just restart your computer and you should be able to edit your registry again.

Method 2

Another method you can use is to go to Start, then Run and paste the following line into the run box:
REG add HKCU\Software\Microsoft\Windows\CurrentVersion\Policies\System /v DisableRegistryTools /t REG_DWORD /d 0 /f
disabled registry
Now try to open the registry editor and see if it works. You may have to restart your computer for the effects to take place.
Note: Before making any changes to the registry, read my article on how to backup and restore the registry in case something goes wrong. 

Method 3

If you don’t like to mess with the registry, you can download a VBScript that will enable the registry for you when you run it. The script is a little more advanced and will not harm your computer, it’s actually written by a Microsoft MVP!
You can download the script here and then just double click on it to run it. After that, try the registry should be enabled.
If none of the above methods work, you may have a virus or some other sort of malware installed on your computer. In some cases, there is a file called regedit.com that gets created and you have to either delete it or rename it to regedit.exe. Read this post on how to remove spyware and malware from your computer. Enjoy!
read more

Monday, 17 December 2012

How To Wire Your Own CAT-5 CABLE


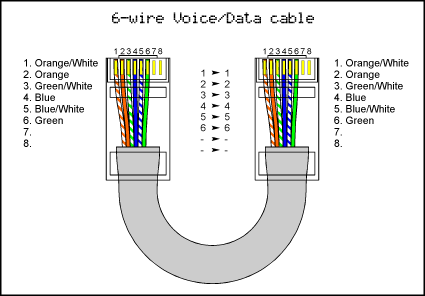
The images below depict the cable pin-outs for straight-through and cross-over Cat-5 Ethernet cables that conform to EIA/TIA industry standard for 568 A and B. IF the first and second pin are orange, the cable is 568B. If the first and second pins are green, the cable is 568A. If one end of the cable is A and the other end is B then you now have a cross-over.

CAT-5 Straight-Through Cable Pin Assignments


CAT-5 Cross-Over Cable Pin Assignments


Symptoms associated with incorrect wiring include:
  • No connectivity
  • Radio not negotiating correctly
  • Needing to be set to 10 Half Duplex (HDX) or 10 Full Duplex (FDX)
  • Connectivity to the radio only at a very short distance


Trango Power-over-Ethernet (PoE) Junction Box Pin-out

For License-Exempt Frequency Products — PoE Junction Box (Part# JBOX-2)

PinFunctionalities
1Data (TX +)
2Data (TX -)
3Data (RX +)
4Ground (-)
5Ground (-)
6Data (RX -)
7Power (+)
8Power (+)


read more

LAN CABLE


read more

Saturday, 3 November 2012

How To Speed Up Torrents with Low Seeders

Here’s a ridiculously easy tip to squeeze out as many users as you can on a dead or dying torrent. It’s particularly handy when a torrent stops near the end, and/or the seed count is listed as zero. Having said that, I’ve also noticed that it helps to increase download speeds from healthy torrents, as well.

NOTE: Do not attempt this trick with private torrents - it’ll only get you banned from the tracker. Use this tip with torrents you find at isohunt, thepiratebay, etc.
How it works:

Simple. Just copy/paste this list of public trackers into your torrent’s tracker list.
Code:
http://tracker2.istole.it:60500/announce

http://inferno.demonoid.com:3407/announce

http://vip.tracker.thepiratebay.org/announce

http://track.sextorrent.to:2710/announce

http://tracker.deluxebits.to:3552/announce

http://denis.stalker.h3q.com:6969/announce

http://tracker.thepiratebay.org/announce

http://tracker.torrentbox.com:2710/announce

http://tracker.hexagon.cc:2710/announce

http://tracker.torrent.to:2710/announce

http://axxo.sladinki007.net:6500/announce

http://220.162.244.175:53880/announce

http://tpb.tracker.prq.to/announce

http://open.tracker.thepiratebay.org/announce

http://eztv.sladinki007.net:60500/announce

http://tv.tracker.prq.to/announce

http://218.145.160.136:8080/announce

http://tracker.prq.to/announce

http://tracker.torrenty.org:6969/announce

http://tpb.tracker.thepiratebay.org/announce

http://t.ppnow.net:2710/announce

http://www.torrentvideos.com:6969/announce

http://tracker.bitebbs.com:6969/announce

http://www.torrent-downloads.to:2710/announce

http://eztv.sladinki007.eu:60500/announce

http://www.ipmart-forum.com:2710/announce

http://tracker.ydy.com:83/announce

http://bt1.the9.com:6969/announce

http://tracker.sladinki007.net:6500/announce

http://tracker.ydy.com:102/announce

http://tracker.paradise-tracker.com:12000/announce

http://moviesb4time.biz/announce.php

http://tracker.deadfrog.us:42426/announce

http://mpggalaxy.mine.nu:6969/announce

http://www.sumotracker.org/announce

http://www.h33t.com:3310/announce

http://t1.pow7.com/announce

http://tracker.publicbt.com:80/announce

http://tracker.publicbt.org:80/announce

http://pow7.com:80/announce

http://tracker.token.ro:80/announce

http://viv.tv.tracker.prq.to/announce

http://publicbt.ath.cx/announce

http://tracker.prq.to:80/announce

http://tracker.ilibr.org/announce

http://tracker.harryy.us:80/announce

http://tracker.prq.to:6969/announce

http://tracker.ilibr.org:6969/announce

http://tracker.ilibr.org:80/announce

http://10.rarbg.com:80/announce

http://tracker.publicbt.com:80/announce

http://www.h33t.com:3310/announce

http://denis.stalker.h3q.com:80/announce

Applying the trackers to uTorrent:

In particular, this is a ‘µTorrent-compatible’ list, so that’s where I’ll show the example.

Open µTorrent, and right-click on the suspiciously-slow torrent. Select "Properties…".


In the first window box, the "General" tab should be open, and there should already be a list of existing trackers (or perhaps just one). ‘Copy’ the list from above, and ‘paste’ them into the window.


While you’re at it, make sure that “Enable DHT” and “Peer Exchange” have checks in them, too. Now, if there are ANY public users on that torrent, you’ll be sure to find them.
read more

Friday, 2 November 2012

Secret Codes For Android Mobile Phones


1. Complete Information About your Phone

*#*#4636#*#*
This code can be used to get some interesting information about your phone and battery.


Usage statistics

2. Factory data reset
*#*#7780#*#*
This code can be used for a factory data reset. It'll remove following things:
Google account settings stored in your phone
System and application data and settings
Downloaded applications
It'll NOT remove:
Current system software and bundled application
SD card files e.g. photos, music files, etc.
Note: Once you give this code, you get a prompt screen asking you to click on "Reset phone" button. So you get a chance to cancel your operation.

3. Format Android Phone

*2767*3855#
Think before you give this code. This code is used for factory format. It'll remove all files and settings including the internal memory storage. It'll also reinstall the phone firmware.
Note: Once you give this code, there is no way to cancel the operation unless you remove the battery from the phone. So think twice before giving this code.

4. Phone Camera Update

*#*#34971539#*#*
This code is used to get information about phone camera. It shows following 4 menus:
Update camera firmware in image (Don't try this option)
Update camera firmware in SD card
Get camera firmware version
Get firmware update count
WARNING: Never use the first option otherwise your phone camera will stop working and you'll need to take your phone to service center to reinstall camera firmware.

5. End Call/Power

*#*#7594#*#*
This one is my favorite one. This code can be used to change the "End Call / Power" button action in your phone. Be default, if you long press the button, it shows a screen asking you to select any option from Silent mode, AirPlane mode and Power off.
You can change this action using this code. You can enable direct power off on this button so you don't need to waste your time in selecting the option.

6. File Copy for Creating Backup

*#*#273283*255*663282*#*#*

This code opens a File copy screen where you can backup your media files e.g. Images, Sound, Video and Voice memo.

7. Service Mode

*#*#197328640#*#*
This code can be used to enter into Service mode. You can run various tests and change settings in the service mode.

8. WLAN, GPS and Bluetooth Test Codes:

*#*#232339#*#* OR *#*#526#*#* OR *#*#528#*#* - WLAN test (Use "Menu" button to start various tests)

*#*#232338#*#* - Shows WiFi MAC address

*#*#1472365#*#* - GPS test

*#*#1575#*#* - Another GPS test

*#*#232331#*#* - Bluetooth test

*#*#232337#*# - Shows Bluetooth device address

9. Codes to get Firmware version information:

*#*#4986*2650468#*#* - PDA, Phone, H/W, RFCallDate

*#*#1234#*#* - PDA and Phone

*#*#1111#*#* - FTA SW Version

*#*#2222#*#* - FTA HW Version

*#*#44336#*#* - PDA, Phone, CSC, Build Time, Changelist number

10. Codes to launch various Factory Tests:

*#*#0283#*#* - Packet Loopback

*#*#0*#*#* - LCD test

*#*#0673#*#* OR *#*#0289#*#* - Melody test

*#*#0842#*#* - Device test (Vibration test and BackLight test)

*#*#2663#*#* - Touch screen version

*#*#2664#*#* - Touch screen test

*#*#0588#*#* - Proximity sensor test

*#*#3264#*#* - RAM version
read more

Wednesday, 31 October 2012

EDIT YOUR SYSTEM REGISTRY


Steps

  1. 1
    Go to the start menu to open run application launching window and then type regedit (then enter) to start the registry editing program. The registry editor should start.

Edit Background Information

How the Registry is stored

  1. 1
    In Windows 95, 98, and Me, the Registry is contained in two hidden files in your Windows directory, called USER.DAT and SYSTEM.DAT.
  2. 2
    In Windows 2000 and Windows XP, the Registry is stored in several Hives, located in the \windows\system32\config and \Documents and Settings\ {username} folders.

Structure of the Registry

  1. 1
    The Registry has a hierarchal structure, like the directories on your hard disk. Each branch (denoted by a folder icon in the Registry Editor, see below) is called a Key. Each key can contain other keys, as well as Values. Each value contains the actual information stored in the Registry. There are three types of values; String, Binary, and DWORD - the use of these depends upon the context.
  2. 2
    There are six main branches (five in Windows 2000 and Windows XP), each containing a specific portion of the information stored in the Registry. They are as follows:
    • HKEY_CLASSES_ROOT - this branch contains all of your file types as well as OLE information for all your OLE-aware applications.
    • HKEY_CURRENT_USER - this branch points to the part of HKEY_USERS appropriate for the current user.
    • HKEY_LOCAL_MACHINE - this branch contains information about all of the hardware and software installed on your computer. Since you can specify multiple hardware configurations, the current hardware configuration is specified in HKEY_CURRENT_CONFIG.
    • HKEY_USERS - this branch contains certain preferences (such as colors and control panel settings) for each of the users of the computer. In Windows 95/98/Me, the default branch here contains the currently-logged in user. In Windows 2000/XP, the default branch here contains a template to be used for newly-added users.
    • HKEY_CURRENT_CONFIG - this branch points to the part of HKEY_LOCAL_MACHINE appropriate for the current hardware configuration.
    • HKEY_DYN_DATA (Windows 95/98/Me only) - this branch points to the part of HKEY_LOCAL_MACHINE, for use with Windows' Plug-&-Play subsystem.

Using the Registry Editor

  1. 1
    The Registry Editor (regedit.exe) is included with Windows to enable you to view and edit the contents of the Registry. When you open the Registry Editor, you'll see a window divided into two panes. The left side shows a tree with folders (see Structure of the Registry above), and the right side shows the contents (values) of the currently selected folder (key).
    • To expand a certain branch, click on the little plus sign [+] to the left of any folder, or just double-click on the folder.
    • To display the contents of a key (folder), just click the desired key, and look at the values listed on the right side. You can add a new key or value by selecting New from the Edit menu. You can rename any value and almost any key with the same method used to rename files; right-click on an object and click rename, or click on it twice (slowly), or just press F2 on the keyboard. Lastly, you can delete a key or value by clicking on it, and pressing Delete on the keyboard, or by right-clicking on it, and choosing Delete.

Edit Possible Edits

Uninstall Programs Manually

  1. 1
    Just because Windows XP has the Add/Remove Programs feature it doesn't mean your application will appear in the list. Furthermore, even if it does appear, it's no guarantee that the uninstall feature will work. When you run across one of these situations the items listed below will help in getting rid of the application. Be aware that these steps may not remove everything associated with the application and can impact other applications on the computer. Have a backup or restore point and use caution.
  2. 2
    Find the directory for the application and delete all the files in the directory. Delete the directory.
  3. 3
    Open regedit and navigate to HKEY_LOCAL_MACHINE\SOFTWARE and find the folder for the application. Delete the folder.
  4. 4
    Open regedit and navigate to HKEY_CURRENT_USER\SOFTWARE and find the folder for the application. Delete the folder.
    • To remove the application entry from Add/Remove Programs (if present), open regedit and navigate to HKEY_LOCAL_MACHINE\SOFTWARE\Microsoft\Windows\CurrentVersion\Uninstall and find the folder for the application. Delete the folder.
    • Some applications have Services attached to them. If this is the case, navigate to HKEY_LOCAL_MACHINE\System\CurrentControlSet\Services, locate and delete the service.
  5. 5
    In Windows Explorer, navigate to the individual user settings and delete program references. Common places to check would be:
    • C:\Documents and Settings\All Users\Start Menu\Programs and delete relevant entries.
    • C:\Documents and Settings\All Users\Start Menu\Programs\Startup and delete relevant entries.
    • C:\Documents and Settings\%YourUserID%\Start Menu\Programs and delete relevant entries. [Do this for each User ID listed]
    • C:\Documents and Settings\%YourUserID%\Start Menu\Programs\Startup and delete relevant entries.[Do this for each User ID listed]
  6. 6
    If no entries were found in the previous step and the application launches automatically, navigate to

HKEY_CURRENT_USER\Software\Microsoft\Windows NT\CurrentVersion\Windows and delete the entry.

Move Location of History Folder

By default, History files (the URL to sites that you have visited, organized by day) are stored at in the folder %USERPROFILE%\Local Settings\History. You can redirect these files to any folder using the following Registry changes:
  • Hive: HKEY_CURRENT_USER
  • Key: Software\Microsoft\Windows\CurrentVersion\Explorer\UserShellFolders
  • Name: History
  • Data Type: REG_SZ
  • Value: path to new folder

Clear Pagefile on Shutdown

When Windows shuts down, it leaves the pagefile intact on the hard drive. Some programs may store sensitive information in clear text format in memory (which in turn may be paged out to disk). You may wish to empty this file for security reasons, or to help speed a boot time defrag, or because you dual boot, and you don't want to share the file, or just as part of troubleshooting a problem. Making the following registry change (or create the following entry) will clear your page file when rebooting.
  • Hive: HKEY_LOCAL_MACHINE
  • Key: SYSTEM\CurrentControlSet\Control\Session Manager\Memory Management
  • Name: ClearPageFileAtShutdown
  • Data Type: REG_DWORD
  • Value: 1

Disable Changing Passwords

If, for some reason, you decided that you didn't want users of a Windows 2000 computer to be able to change their password unless prompted to, you can make this Registry change to implement that:
  • Hive: HKEY_CURRENT_USER
  • Key: Software\Microsoft\Windows\CurrentVersion\Policies\System
  • Name: DisableChangePassword
  • Data Type: REG_DWORD
  • Value: 1
A value of 0 means they can change their password whenever they want to. A value of 1 means that users will not be able to change their password unless prompted (by the password expiring, or by the box next to "User Must Change Password at Next Logon" being checked). Please use caution and frequent backups when working with the Registry.

Get Rid of Shared Documents

New to Windows XP is a "Shared Documents" folder that appears in My Computer. This is really just a pointer to another area on disk. You can keep this from appearing by deleting the following Subkey from the Registry:
  • Hive: HKEY_LOCAL_MACHINE
  • Key: SOFTWARE\Microsoft\Windows\CurrentVersion\Explorer\My
  • Computer\NameSpace\DelegateFolders
  • Subkey: {59031a47-3f72- 44a7-89c5-5595fe6b30ee}
  • Delete the whole Subkey and all that it contains.
You may wish to right-click this Subkey and export it before deleting it, just to be safe. This also will prevent the current users "My Documents" from showing up in the same area of My Computer. Use caution and frequent backups when editing the Registry.

Model your explorer toolbars

This helps you add an image to the background of your explorer toolbar. To do this go to HKEY_CURRENT_USER\Software\Microsoft\Internet Explorer\toolbar and add a new string value named? BackBitmapShell? (Without quotes) to it and set its value to the path of the image file. Tip #595: Add a background bitmap to the Internet Explorer toolbar One can easily add a bitmap to the Internet Explorer toolbar. Go to HKEY_CURRENT_USER\Software\Microsoft\Internet Explorer\Toolbar and create a new string value named? BackBitmapIE5? (For Internet Explorer 5) and set the path of the bitmap as it value.

Show a Recycle Bin in your My Computer

  • Hive: HKEY_LOCAL_MACHINE
  • Key: SOFTWARE\Microsoft\Windows\CurrentVersion\Explorer\My
  • Computer\NameSpace
  • In NameSpace create a New Key & named it as {645FF040-5081-101B-9F08-
  • 00AA002F954E}
  • Now in Right pane make a value Default to “Recycle Bin” without Quotes.
  • Refresh a comp or Restart a comp to effect a change that u have made  
    1. Attributes
  • 70 01 00 20? Adds both rename and delete to the menu
  • 50 01 00 20? Adds only rename option to the menu
  • 60 01 00 20? Adds only delete to the menu
  • 47 01 00 20? Adds cut, copy, paste to the menu
  • 40 01 00 20? Changes the menu to its default condition

Shutdown XP Faster

When a user shuts down Windows XP, first the system has to kill all services currently running. Every once in a while the service does not shut down instantly and windows give it a change to shut down on its own before it kills it. This amount of time that windows wait is stored in the system registry. If you modify this setting, then windows will kill the service earlier. To modify the setting, follow the directions below:
  • Start Regedit.
  • Navigate to HKEY_LOCAL_MACHINE/SYSTEM/CurrentControlSet/Control.
  • Click on the "Control" Folder.
  • Select "WaitToKillServiceTimeout"
  • Right click on it and select Modify.
  • Set it a value lower than 2000 (Mine is set to 200).
  • Or
  • Like previous versions of windows, it takes long time to restart or shutdown windows
xp when the "Exit Windows" sound is enabled. To solve this problem you must disable this useless sound. Click start button then go to settings -> control panel -> Sound, Speech and Audio devices -> Sounds and Audio Devices -> Sounds, then under program events and windows menu click on "Exit Windows" sub-menu and highlight it. Now from sounds you can select, choose "none" and then click apply and ok. Now you can see some improvements when shutting down your system.

Display message on startup XP

If you would like to display a legal message or any other message in a pop-up window when windows starts read below:
  • Start Regedit; if you are unfamiliar with Regedit please see our FAQ.
  • Navigate to HKEY_LOCAL_MACHINE/SOFTWARE/Microsoft/Windows
  • NT/CurrentVersion/Winlogon.
  • Modify the key “legalnoticecaption” with what you want to name the window.
  • Modify the key “legalnoticetext” with what you want the window to say.
  • Restart.

Change a name of Microsoft Internet Explorer

  • Hive: HKEY_CURRENT_USER
  • Key: Software\Microsoft\Internet Explorer\Main
  • Name: Window Title
  • Data Type: REG_SZ
  • Value: Text
  • Whatever text you enter in for the value will appear in the title of the IE Window.
  • Note: I have only checked this in IE 5.x and 6.x.

Edit Warnings

  • Editing the registry can be very dangerous, and can cause permanent damage to your system!
  • Write down the your changes and initial values. You may need to restore the registry as it was.
  • Registry editing may not be possible in some Windows versions.
  • A few words about clearing the pagefile on shutdown. Doing this has no performance benefits whatsoever. This does not delete the file but overwrites every byte with zero's. A boot time defrag will not be sped up by doing this. Clearing the pagefile is sometimes done as a security measure. But unless it is a part of a well thought out security policy it will avail you little. There are many other ways to obtain access to sensitive data and most of them require less effort. It should also be noted that this will considerably lengthen shutdown times.
read more

Friday, 19 October 2012

Clean Your RAM Using Notepad


How To Clean Your RAM Using Notepad

without using any software


>First open notepad

>Type FreeMem=Space(10240000000)

>Save it as CLEANER.VBS in any location you like.

>You can edit the code and write 512 instead of 1024 if you own a 512mb RAM or change to anything you like.

>Then run it !
read more